


Agent Snapshots: The Missing Feature You Need
How to keep a trail of WIP Agentforce versions for comparison and reversion

I was “improving” an Agentforce agent the other day when I broke it. And when I tried to undo my changes, I couldn’t fix it. Clearly, I had changed something (or maybe Agentforce changed?) but what? I couldn’t tell.
In normal software development, you use tools like git to keep older versions around. I practically abuse git to snapshot my project all the time so I keep out of trouble. But Agentforce’s “IDE” (so to speak) is the interactive UI in setup, and there’s no “commit to git” capability built in.
If there was one big consolidated text definition of an Agent, I could just copy and paste it into a text editor somewhere. But there’s dozens of places to put text, and it’s just not practical. Nonetheless, if you’re doing any serious work with Agentforce, you’ll want to keep lots of backups as you progress through the process of making changes so you can see what you’ve eff’ed up when you break things.
To keep a usable history, I’ve cobbled together some shell scripts that use the “sf” command line tool from Salesforce and “git” to keep older version. I will apologize in advance that this is all for Mac / Linux OSes, so you may have to make some changes for Windows.
I also will apologize that this is all going to look horribly overwrought. If you just read through it will make sense, and in the end it’s pretty easy once you have things working.
Solution Overview
Salesforce has a command line tool “sf” (related to sfdx) that you can use to move metadata between your org and your local computer. If you’ve used Visual Studio Code to manage a Salesforce project, it’s using it behind the scenes to move things back and forth.
We’ll use it to pull down just the metadata related to agents (completely isolated from any VSC projects we might also have).
Then, we’ll use “git” to create snapshots of the metadata. There’s no real need to push this off to a cloud repository like GitHub or Bitbucket, but you could if you really wanted to.
Now, might we expect that there’s an “Agent” metadata that makes it easy to move definitions back and forth? Only if we’re hopelessly naive. There’s a bunch of metadata types that hold your agent definitions and it’s messy as hell, unfortunately. I’ve tracked down where it all goes.
Metadata Architecture
Because it’s so messy, I wrote a companion to this article with a series of screen shots showing how the Agentforce builder UI maps into actual metadata. It’s there as a reference when you’re trying to track down a specific element in your agent from an archived copy of the metadata:
Mapping from Agentforce UI to Metadata

These are a series of screen shots that show how elements of the Agentforce UI are mapped into metadata. I haven’t quite annotated everything, but it should be enough.
You won’t need to worry about this … yet. When you need it, you’ll know.
How to Archive Snapshots
There are probably a dozen ways to archive snapshots of Agentforce data. If you have a Visual Studio Code project, you could just add in the metadata types GenAiPlanner, GenAiPlugin, GenAiPromptTemplate, GenAiFunction, and Bot to your package.xml file. Then you’ll have everything in there. You’ll have to retrieve metadata frequently (and make sure you’re using API version 62.0 or later) for every snapshot, but it’s doable.
If you don’t want to fill your VSC project with lots of meaningless commits, you can maintain a repository just for your agent. Here are the steps you need to follow to get set up to make regular snapshots of your work:
Install git, if you haven’t already
Install sf, if you haven’t already
Authorize sf to your org
Create a project to track the metadata
Create a git repository to track your changes
Once that’s done, every time you want to create a snapshot, you will:
Retrieve the metadata that holds agents
Commit the changes to your repository
Let’s walk through those steps.
Getting Set Up
Installing Git
GitHub has a good guide for installing git:
https://github.com/git-guides/install-git
They recommend installing GitHub desktop and so do I, but it’s not required.
Installing SF
Salesforce provides instructions for installing the SF command line tool:
If you’re already using Visual Studio Code with the Salesforce plug-ins, odds are you already have this installed, but if you’re unsure it won’t hurt to reinstall it.
Regardless, you should probably issue a “sf update” command when you’re done just to make sure you’ve got the latest version.
Authorize an Org
To authorize access to your org, issue the command:
sf org login web
That will open a browser and have you log into your org to authorize access.
The SF cli tool maintains a list of orgs it has access to. You can see which it knows about via the command sf org list:

It’s going to be handy to have an alias for the org, so:

Before the = is the alias name, and after is the login user id. You can see I’m using my Agentforce Trailhead training org here.
Create a Project
In order to retrieve the Agent metadata, you’ll need to create a project locally on your computer. “cd” (or “chdir”) to a parent directory that will hold your project, and issue the command:
sf project generate --name copilot
The name “copilot” can be anything you want, and it will become the name of your directory.
You should see output like:

Create a Git Repository
Now, cd into your “copilot” directory (or whatever you called it), and issue the command git init:

You’re all ready to go now!
Taking a Snapshot
You will need to be in your “copilot” directory to do this.
First, set a shell variable to the alias of your org:
org=trailhead
(replace “trailhead” with the alias of your org you set earlier, if not trailhead…)
Next, issue the commands:
sf project retrieve start --target-org $org --metadata GenAiPlanner
sf project retrieve start --target-org $org --metadata GenAiPlugin
sf project retrieve start --target-org $org --metadata GenAiPromptTemplate
sf project retrieve start --target-org $org --metadata GenAiFunction
sf project retrieve start --target-org $org --metadata Bot
This will look something like this:

It goes on and on…
Now you have local copies of your Agentforce agents!
Next, you can optionally commit the latest version to your local repository. Start by issuing the command:
git add .
This indicates that everything in your current directory and below should be tracked by your repository.
Then, to actually add the current snapshot:
git commit -m "Something truly pithy"
This will look like:

That’s a lot of files, but this was the very first time. Later, as you take new snapshots with the sf command, you’ll only see the files that have changed.
You could, if you like, put all this into a shell script for one and done usage.
I broke something, now what?
Assuming you’ve been making lots of changes and been diligent making snapshots (and committing them) along the way, and you suddenly realize you broke something and want to go back, how do you do that?
The first thing to do is take a new snapshot but don’t add or commit it with git. Instead, issue the command git status:

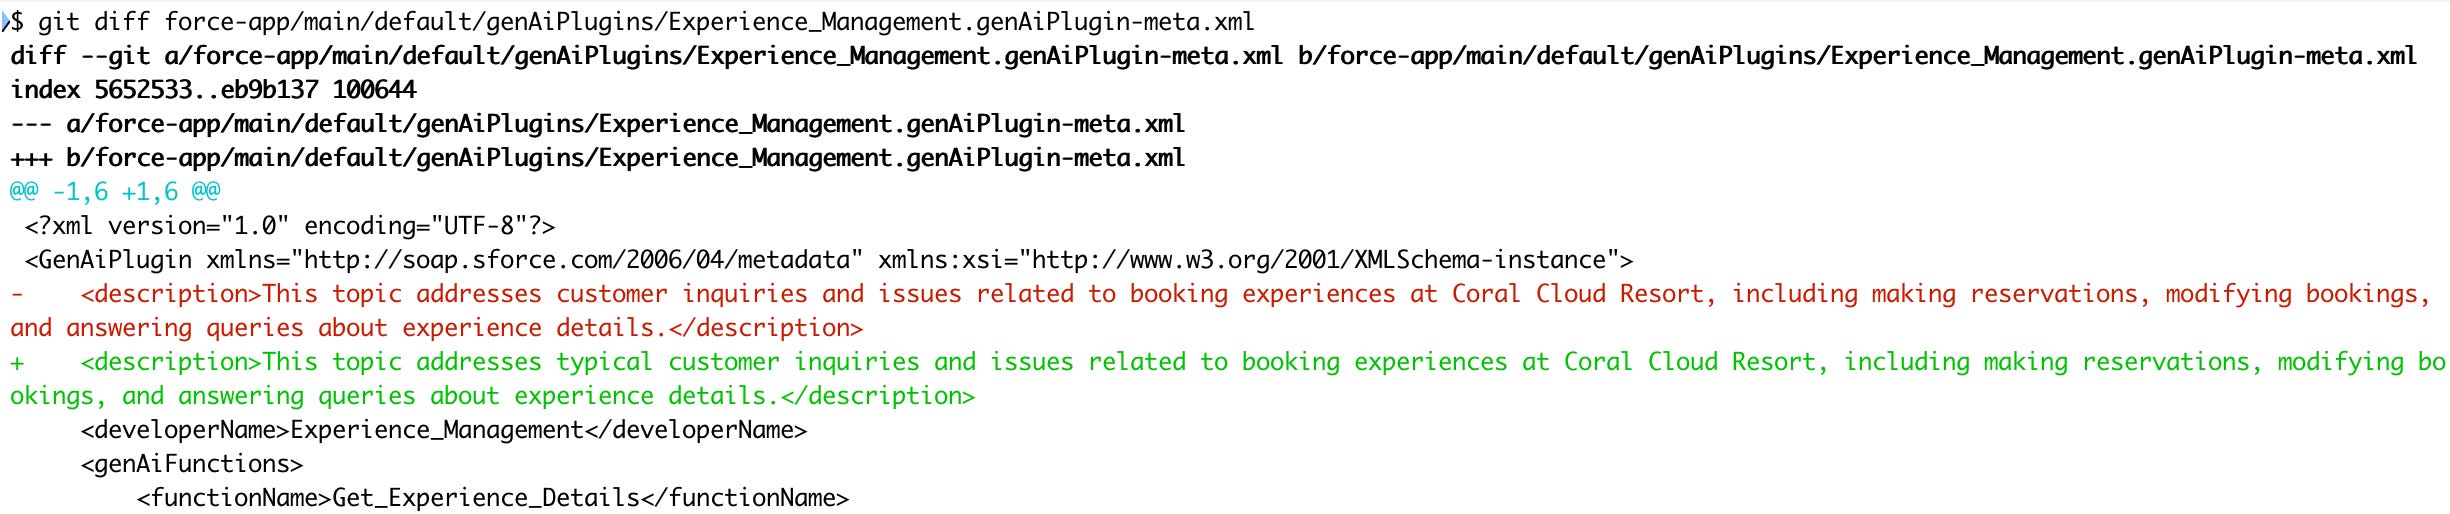
Aha, I changed something in my “Experience Management” topic (and nothing else since the last commit). I can see what that is by doing a git diff on the file:
I mentioned before that you might find the GitHub desktop helpful. Here’s doing the same thing in that application:

Easier and prettier.
Wrapping Up
There’s a lot more you can do with these tools and this is just a start. As you get more comfortable with them, you may find better and easier ways to do things.
The fact that the Agentforce UI encourages you to make changes with no easy way to revert them (short of creating new versions) is a real issue, as minor prompt changes can completely break your agent and reverting to a know working version is the only way to avoid wasting hours.
Trust me, I didn’t work through all this because it seemed fun. I did it because I’ve broken Agents and then flailed trying to figure out what the heck I did and how to undo it…