

Building the Salesforce-aware ChatBot
Building the Salesforce-aware ChatBot
All the secrets revealed!

BOO! Happy Halloween! Hopefully this is a treat even though I’m going to show a few tricks. Last week I gave you an introduction into how to build a ChatBot that used GPT that could access Salesforce data live.
In that post, I gave a high level view of how the application worked with Salesforce and OpenAI:

But since we don’t control OpenAI and Salesforce (and heaven knows we can’t control the users), the only thing that we really have to work with is the ChatBot. From there, we have to orchestrate all the other pieces.
How do we do that? Let’s begin with a high-level flowchart of the design of the bot:

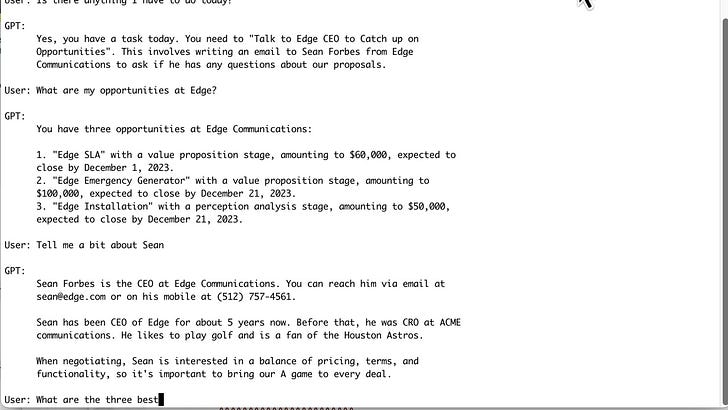
After initializing the application, we fall into a loop of processing the user’s inputs. First we send what the user types into GPT1. When GPT responds, it will return one of two types of results. One is an “assistant” message, which is meant to be displayed to the user. The other is a “function_call”, which indicates2 that it has a SQL statement it wants executed to retrieve Salesforce data.
If you’re new to the concept of functions, I wrote an earlier post exploring how they work:

Obviously, if we get an assistant message back, we just display it to the user and go back to the top of the loop.
If it’s a function call, we translate the SQL that GPT generated into SOQL, execute the call on Salesforce, and generate a new input to GPT with the response. Then that response is fed back to GPT for further processing behind the scenes.3
Normally, once GPT has the data it’s asked for it will generate an output for the user. But sometimes it realizes it needs different data and will generate a second SQL SELECT statement to retrieve e.g. child data. The code happy executes as many functions as GPT needs.4
Eventually, though, GPT will generate output to the display, and we start over again.
This chatbot is designed for explaining a concept, not for putting into production. If you want to deploy a real chatbot to your users, the team at Owls Head would be happy to help. You can reach out to me directly (reply to this email), or visit their website.
Let’s Look at some Code
Since we’re going to be talking about code, you might want to have the code to review! You can get it from GitHub at:
https://github.com/cmcguinness/ChatSF
There’s a README.md that will help you get it up and running, if you like.
There are the following source modules:
chatsf.py: This is the starting point of the application, and drives the chat process.gpt.py: This contains the logic to talk to OpenAI’s APIs.plog.py: This does logging of errors, warnings, information, and debugging messagessalesforce.py: this contains the “function” that GPT calls to query Salesforce as well as the supporting logic.sql2soql.py: this contains the logic to translate SQL into SOQL
It’s around 900 lines of code to make this work, and well over half of them deal with talking to Salesforce. If you had asked me before I wrote any of this, I would have thought that the bulk of the code would have been for working with GPT, not Salesforce. However, much of that code bridges the two worlds: how to explain Salesforce’s capabilities to GPT in a way that it can make good use of them.
As a caveat, even though 900 lines of code is not small,5 this is still a stripped down version which is designed to prioritize clarity over functionality. As such, there’s a lot more that needs to be done to make this a deployable application. I’ll talk about that towards the end of the series.
Take it from the Top!
The application starts with chatsf.py. It does the following things:
Initializes the application, including the GPT and Salesforce modules.
Builds the System Prompt we’ll use (which includes information about the current user).
Has a function that will automatically run through a list of prewritten questions, which can be used either for testing or demonstration.
Has a function that allows the user to interact with the ChatBot
The reality is that it’s not doing the heavy lifting of the application and it’s mostly unaware of the complex processing that is taking place behind the scenes. Still, it’s where the program starts, so we will start there too.
Initialization
The initialization consists of the imports at the top of the file as well as the first method of the class, __init__().
The first thing __init__() does is instantiate (and therefore initializes) the class that handles the interface to Salesforce. We’ll see more about it later, but for the moment the most important thing is that it will connect to Salesforce and retrieve the record for the user. From that we can get their name, title, company, etc.
Using that it builds the system prompt. The hope is that when GPT is generating content, it can fill in the blanks for [Your Company] etc. in its outputs. Does that work? Sometimes. We’ll talk about that later too.6
Next up, the code instantiates the interface to GPT, passing in the system prompt as well as our instance of SalesforceFunctions. It’s not quite visible to us here, but the SalesforceFunctions class will provide GPT with the database query function and metadata that GPT will use to generate queries into Salesforce.
After that, we print our hello and __init__ is done.
ReWrapText
One of the problems in a chatbot is that GPT will return very long lines of text, and if we just print them out they can run off the edge of the window. So we need to word-wrap the text. But you cannot just word-wrap the entire text at once; you have to word-wrap each line individually to preserve the structure in the text.
The method rewraptext() does that.
Bot_Print
If the output spans multiple lines, print each line with an indent so things line up nicely.
AutoBot
The autobot() method will run through your test cases as a simulation of a user scenario.
It just loops over the lines passed into it, simulating the user having typed them in (either all at once or at a slower pace in the show pony mode) and then feeds them to GPT to answer them (and print the response).
ChatBot
This is the method that drive the interactive process. And it’s all of 4 lines of code:
while True:
    u = input('\nUser: ')
    g = self.rewrap_text(self.gpt.ask_gpt(u))

    self.bot_print(g)
Talk about Low Code!7
if __name__ == “__main__”:
This is a fairly standard way to kick off processing in a Python program. This section of code just initializes the log file, defines the test suite inputs, runs the autobot, and then launches the chatbot. Comment out running the autobot if you don’t want it.
Final Thoughts
This post really covers the least exciting bits of the application, as clearly the heavy lifting happens elsewhere. In the next post I’ll start with probably the most interesting and challenging part, the SQL to SOQL conversion.
The one thing I think you’ll discover, especially if you play with the application yourself, is how little you have to tell GPT for it to appear knowledgeable about your Salesforce system and its customer data.
If you have a hard time getting the chat bot up and running, leave a comment or reply to the post. I’m happy to lend you a hand! The goal here is for you to not just hear what is possible but to see how it actually behaves.8
Into gpt-3.5-turbo to be specific, unless you are feeling rich, in which case gpt-4. I’ll just use the acronym GPT to represent either one of them.
In our case; functions are a generic mechanism that can be used for any purpose not just SQL generation.
When we explore the code, you’ll see that we send the results back to GPT not as a user message but as a function message so that it knows it was the results of the function call.
Although, perhaps, the user is not as happy waiting.
OK, about half of it is comments and whitespace, because I do not subscribe to the Jackson Pollock “drip period” school of code formatting, let alone his “black period” style.
I’m building up quite the list of “to talk about later”s.
If we don’t talk about the other 800+ lines of code, of course.
The wooden clock analogy I used a few months ago.